Each organization in the global community of Crossref members (that’s currently over 24k organizations in 166 different countries) plays a key role in building the Research Nexus. Any opportunity we have to meet with our members in person is a highlight and a way for us to learn more from each other. The month of January saw three of us travel to Bangkok to attend the first-ever Charleston Conference organised in Asia and to meet with our growing community in Thailand.
This year, we placed a spotlight on the Latin American community, hosting the second Crossref Metadata Sprint in São Paulo, Brazil from 4 - 6 March 2026. In our first tri-lingual event, we brought together 31 participants from Argentina, Brazil, Colombia, Ecuador, and Mexico. Our goal was to foster community co-creation using the open scholarly metadata. The Sprint was an opportunity to pose questions, share ideas, collaborate on research, and propose innovative solutions that enhance the use of metadata in scholarly communication and beyond.
Read on for more details about the content of the Sprint, and the resulting projects. You can also register to join our Sprint Showcase call on 22nd April to hear directly from the team about their creations.
On 17 March 2026, we experienced an outage that affected DOI resolution for Crossref DOIs and the deposit of metadata records by Crossref members. In this summary, we outline what happened, the impact on our community, and the steps we are taking to strengthen our systems and processes as a result.
We’re excited to announce a new data citation API endpoint and are seeking your feedback. The new service makes existing data citation relationships in our metadata available, thereby surfacing this part of the research nexus. At the same time, we’ve decided that it’s time to move on from Event Data.
To work out which version you’re on, take a look at the website address that you use to access iThenticate. If you go to ithenticate.com then you are using v1. If you use a bespoke URL, https://crossref-[your member ID].turnitin.com/ then you are using iThenticate 2.0.
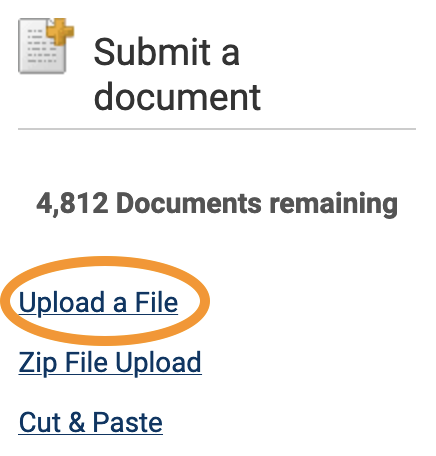
Upload a File allows you to submit a single document from a variety of document types. From the Submit a document menu, click Upload a File, and the Upload a file form opens.
Under Destination Folder, choose the folder to which you wish to upload the file. Its Similarity Report will be added to the same folder.
Complete Author First Name, Author Last Name, and Document Title fields. If Document Title is left blank, the document’s filename will be used.
Click Choose File, and locate the file to upload. Use Add another file to add more files, up to a total of ten.
Click Upload to proceed with with uploading the selected document(s), or click Cancel to cancel the upload.
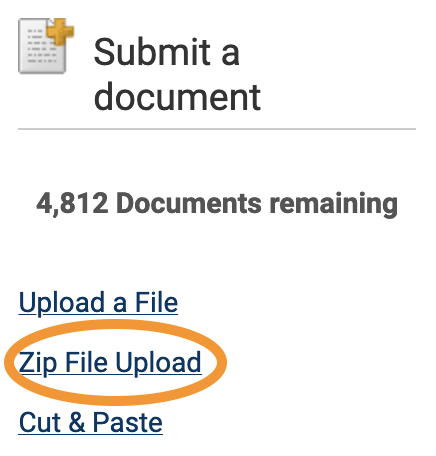
Zip file upload (v1)
iThenticate allows you to submit multiple documents from a variety of document types in a compressed zip file. The zip file may be up to approximately 100MB in size and contain up to 1,000 individual files. If the zip file exceeds either limit, it will be rejected. Check that your zip file contains only accepted file types, and no duplicate copies of the same file.
Click Zip File Upload from the Submit a document menu. Choose your Destination Folder from the drop-down. The Similarity Report for the file will also be found here.
The information you enter in the Author First Name and Author Last Name fields will be applied to all the documents in the zip file. You can manually change these once the document is uploaded to the folder.
Click Choose file, locate the zip file on your device, and click Upload.
The title of the each document in the zip files will be the default title of each submission.
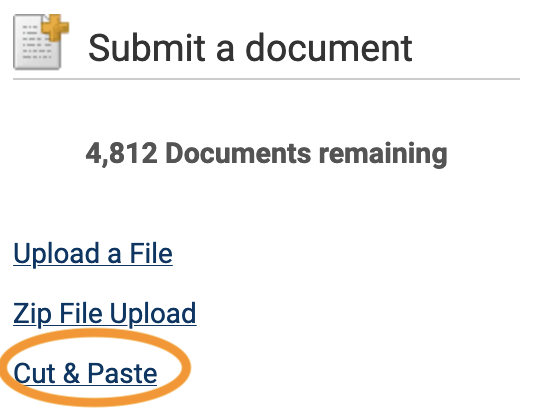
Cut and paste (v1)
Use the cut and paste submission option to submit information from non-supported file types, or to submit only specific parts or areas of a document.
Only text can be submitted using this method - any graphics, graphs, images, and formatting are lost when pasting into the text submission box.
Click Cut & Paste from the Submit a document menu.
Choose your Destination Folder from the drop-down. The Similarity Report for the file will also be found here.
Complete the Author First Name, Author Last Name, and Document Title fields. If no title is given, the default title “Pasted Document” will be used.
Copy your desired text for checking, paste it into the Paste your document in the area below text box, and click Upload.
To view recent uploads, go to the Submit a document menu, click Recent Uploads, and you will see recent uploads listed in reverse chronological order (most recent first). Click the Date & Time header to see the uploads in chronological order (oldest first).
Edit document information (v1)
To edit a document’s information (title and author name), click the edit icon to the right of a document in a folder. You will see the Document Properties page. Edit the fields, and click Update to save your changes.
Page maintainer: Kathleen Luschek Last updated: 2020-May-19